Setting up and sharing a network printer makes it possible for multiple users to utilize it. You can set up a local printer that is connected directly to the print server, or you can set up a network interface printer that is connected to the print sewer over the network. In larger organizations, most printers are network interface printers.
How to Add and Share a Local Printer
The steps for adding a local printer or a network interface printer are similar. You use the following steps to add a local printer: To share a printer on Windows 10 with other users
- Open Settings.
- Click on Devices.
- Click on Printers & scanners.
- In the "Printer & scanners" , select the printer that you want to share.
- Click in the Manage button.

- Click the Printer properties

- Click on the Sharing tab.
- Check the Share this printer option.
- In the "Share name" field, specify a name.

- Click the Apply and OK button

How to connect devices to a shared printer
- Open Settings.
- Click on Devices.
- Click on Printer & scanners.
- Click the Add a printer or scanner button.
- Select the printer from the list to add to the device

- Choose the Select a shared printer by name option.
- Type the path of the printer location:
\\xxx.xxx.xxx.xxx\PRINTER-SHARE-NAME

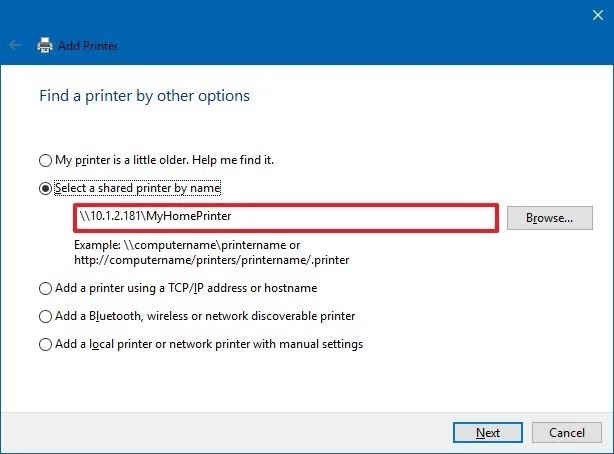
- change the "xxx.xxx.xxx.xxx" and "PRINTER-SHARE-NAME" for the IP address (or computer name) and share the name of the printer that you're trying to connect or you can click the Browse button to locate and select the shared printer.
- Click the Next button.
- Click the Install driver button.


If you have a Plug and Play printer that connects through a USB port, IEEE1394 interface, or any other port that allows you to attach or remove devices without having to shut down and restart your computer, you probably do not n use the Add Printer Wizard. If Windows has the drivers for your printer, You often connect the printer’s cable to your computer (or point the printer toward your computer’s infrared port) and turn on the printer. Windows automatically installs the printer for you.
However, you should always read the installation instructions provided by the manufacturer. With some printers, you must install the software provided by the manufacturer before you connect and turn on the printer. This process helps ensure Windows has the proper drivers available when it first detects the printer.
In larger companies, most printers are network interface printers. These printers offer a distinct advantage: Because you do not need to connect printers directly to the print server, you can place printers where you need them instead of where the print server is.
Install Printer Software Select the appropriate manufacturer and the local printer so that the correct printer driver for printer is not on the list ,you must provide a printer from the manufacturer or select a model that is similar enough so the printer can use it.
Name Your Printer A name that identifies the printer to the users. Some applications might not support more than 31 characters in the sewer and printer name combinations.
Printer Sharing Name Users (With the appropriate permissions) can use the share name to connect to the printer over the network. This name appears when users browse for a printer or supply a path to a printer. The share name must be compatible with the naming conventions for all client computers on the network. By default, the share name is the printer name truncated to an 8.3-character file name.
Location And Comment Describe the location of the printer. Provide information that helps users determine whether the printer meets their needs. If your computer is in a domain, users can search the Active Directory service for the information that you enter here.
No comments:
Post a Comment