How to set disk quotas in windows 10
Managing Disk Quotas
You use disk quotas to manage storage growth in distributed environments. Disk quotas allow you to allocate disk space to users based on the files and folders that they own. You can set disk quotas, quota thresholds, and quota limits for all users and for individual users. You can also monitor the amount of hard disk space that users have used and the amount that they have left against their quota.
Overview of Disk Quotas
Windows 10 tracks disk quotas and controls disk usage on a per-user, per volume basis. Windows 10 tracks disk quotas for each volume, even if the volumes are on the same hard disk. Because quotas are tracked on a per-user basis, every user’s disk space is tracked regardless of the folder in which the user stores files. Disk quotas can be applied only to Windows 10 NTFS volumes.
How to set up Quota per volume on Windows 10
- Open File Explorer
- Click on This PC.
- In "Devices and drives," right-click the drive you want to limit and select Properties.
- Click on the Quota tab.
- Click the Show Quota Settings button

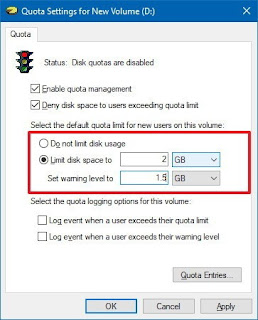
- Check the Enable quota management option.
- Check the Deny disk space to users exceeding quota limit option

- Select the Limit disk space to option.
- Set the amount of space you want
- Set the amount of space before a warning is triggered to the user and specify the size unit
- Click Apply.
- Click OK.
- Restart your compute
How to set up Quota per user on Windows 10
- Open File Explorer
- Click on This PC.
- In "Devices and drives," right-click the drive you want to manage and select Properties.
- Click on the Quota tab.
- Click the Show Quota settings button.
- Check the Enable quota management option.
- Check the Deny disk space to users exceeding quota limit option.

- Click the Quote Entries button.
- If the user you want to restrict isn't listed, click Quota, and select New Quota Entry.
Under "Select Users" tab, click the Advanced button.

- Click the Find Now button.
- Select the account you want.

- Click OK.
- Click OK another time
- Select the Limit disk space to option.
- Set the amount of space you want and specify the size unit
- Set the amount of space before a warning is triggered to the user and specify the size unit

- Click Apply.
- Click OK.
How to Delete a disk quota entry
Check that the Enable quota management option is selected and disk quota is enabled

- Click the Quota Entries button.
- Right-click the user and select Delete.

- Click Yes.
- Select the files owned by the user you're trying to remove.
- Click the Take Ownership button if you want to keep the files, or click the Delete button

Disk usage is based on file and folder ownership Windows 10 calculates disk usage for users based on the files and folders that they own. When a user copies or saves a new file to an NTFS volume or takes ownership of a file on an NTFS volume, Windows 10 charges the disk space for the file against the user’s quota limit.
Disk quotas do not use compression Windows 10 ignores compression when it calculates hard disk space usage. Users are charged for each uncompressed byte, regardless of how much hard disk space is actually used. This is done partially because file compression produces different degrees of compression for different types of files. Different uncompressed file types that are the same size might end up being very different sizes when they are compressed.
Free space for applications is based on quota limit. When you enable disk quotas. the free space that Windows 10 reports to applications for the volume is the amount of space remaining within the user’s disk quota limit.
You use disk quotas to monitor and control hard disk space usage. System administrators can do the following:
- Set a disk quota limit to specify the amount of disk space for each user.
- Set a disk quota warning to specify when Windows 10 should log on an event, indicating that the user is nearing his or her limit.
- Enforce disk quota limits and deny users access if they exceed their limit, or allow them continued access.
- Log an event when a user exceeds a specified disk space threshold. The threshold could be when users exceed their quota limit or when they exceed their warning level.
After you enable disk quotas for a volume, Windows 10 collects disk Usage data for all users who own files and folders on the volume, which allows you to monitor volume usage on a per-user basis. Even if you do not limit the disk space avail. able to users, disk quotas provide an effective means of monitoring the disk space consumed by users.
By default, only members of the Administrators group can view and change quota set tings, However, you can allow users to view quota settings.
Enable Quota Management Select this check box to enable disk quota management.
Deny Disk Space To Users Select this check box so that when users exceed their hard disk
Exceeding Quota Limit space allocation, they receive an Out Of Disk Space message and cannot write to the volume.
Do Not Limit Disk Usage Click this option when you do not want to limit the amount of hard disk space for users.
limit Disk space To Configure the amount of disk space that users can use.
Set warming Level To Configure the amount of disk space that users can fill before Set Windows 10 logs an event, indicating that a users nearing his or her limit.
Log Event When A User Exceeds Their quota limit‘ Select this option if you want windows 10 to log an event in the system log every time a user exceeds his or her quota limit
Log Event when a user exceeds their warning level Select this option if you want windows 10 to log an event in the security log every time a user exceeds the warning level
Quota entries Click this button to open the quota entries for windows, in which you can add a new entry,delete an entry, and view the per-user quota information
How Determine the Status of Disk Quotas
You can determine the status of disk quotas in the Properties dialog box for a disk by checking status message to the right of the traffic light icon The color shown on the traffic light icon indicates the status of disk quotas as follows:
- A red traffic light indicates that disk quotas are disabled.
- A yellow traffic light indicates that Windows )0 Professional is rebuilding disk quota information.
- A green traffic light indicates that the disk quota system is active.
How to Monitor Disk Quotas
You use the Quota Entries For dialog box to monitor usage for all users who have copied, saved, or taken ownership of Files and folders on the volume. Windows 10 scans the volume and monitors the amount of disk Space in use by each user. Use the Quota Entries For dialog box to view the following:
- The amount of hard disk space that each user uses
- Users who are over their quota warning threshold, signified by a yellow triangle
- Users who are over their quota limit, signified by a red circle
- The warning threshold and the disk quota limit for each user
Guidelines for Using Disk Quotas
Use the following guidelines for using disk quotas:
If you enable disk quota settings on the volume where Windows 10 is installed, and your user account has a disk quota limit, log on as Administrator to install additional Windows 10 components and applications. In this way, Windows will not charge the disk space that you use to install applications against the disk quota allowance for your user account.
You can monitor hard disk usage and generate hard disk usage information without preventing users from saving data. To do so, clear the Deny Disk Space To Users Exceeding Quota Limit check box when you enable disk quotas.
Set more-restrictive default limits for_ all user accounts, and then modify the limits to allow more disk space to users who work with large files.
If multiple users share computers running Windows 10 set disk quota limits on computer volumes so that disk space is shared by all users who share the computer.
Generally, you should set disk quotas on shared volumes to limit storage for use Set disk quotas on public folders and network servers to ensure that users sh: hard disk space appropriately. When storage resources are scarce, you might Wan: to set disk quotas on all shared hard disk space.
Delete disk quota entries for users who no longer store files on a volume. You can delete quota entries for a user account only after all files that the user owns have been removed from the volume or after another user has taken ownership of the files


No comments:
Post a Comment